TM 5-3895-367-14&P
Section V. UNIT MAINTENANCE PROCEDURES
4-16. TAILLIGHT REPAIR.
This task covers:
a. Lamp Replacement
c. Installation
b. Removal
INITIAL SETUP
Tools:
Equipment Conditions:
Tool Kit, General Mechanic’s Automotive
Reference
Para 4-11
Wiring harness disconnected from tow-
Materials/Parts:
ing vehicle.
Marker tags (Item 13, Appendix E)
Para 4-11
Taillights removed from spreader (re-
Three lockwashers (removal and installation only)
moval and installation only).
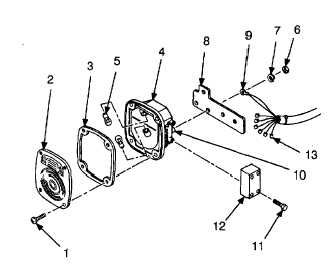
a.
Lamp Replacement.
(1)
Remove four screws (1), lens (2), and
gasket (3) from taillight (4).
(2)
Remove defective lamp (5) from taillight
(4). Discard lamp.
(3)
Install new lamp (5) in taillight (4).
(4)
Install gasket (3) and lens (2) on taillight
(4) using four screws (1).
b.
Removal.
NOTE
The following procedure can be used for
either tail- light. Left-hand taillight is
illustrated. Left-hand tail- light has six
electrical leads. Right-hand taillight has
three electrical leads.
(1)
Remove three nuts (6) and lockwashers
(7) securing bracket (8) to taillight (4).
Remove ground lead (9) and bracket from
studs (10) on back of taillight. Discard
lockwashers.
(2)
Remove four screws (11) and cover (12)
from taillight (4).
(3)
Tag wires (13) connected to taillight (4).
Pull wires off terminals and remove.
c.
Installation.
(1)
Connect wires (13) to terminals. Remove
tags.
(2)
Install cover (12) on taillight (4) using four
screws (11).
(3)
Install bracket (8) on back of taillight (4).
Install ground lead (9)
over one stud (10), then install
three nuts (6) and new lockwashers (7) to
secure bracket to taillight.
FOLLOW-ON MAINTENANCE:
• Install taillights on spreader (para 4-11).
• Connect wiring harness to towing vehicle and
operation of taillights.
4-31


