TM 5-3895-367-14&P
4-32. GATE ADJUSTMENT SCREW REPLACEMENT.
This task covers:
a. Removal
b. Installation
INITIAL SETUP
Tools:
Equipment Conditions:
Tool Kit, General Mechanic’s Automotive
References:
Materials/Parts:
Para 2-1
Gate fully lowered.
Two locknuts
Para 4-15
Spreader uncoupled from dump truck.
Three cotter pins
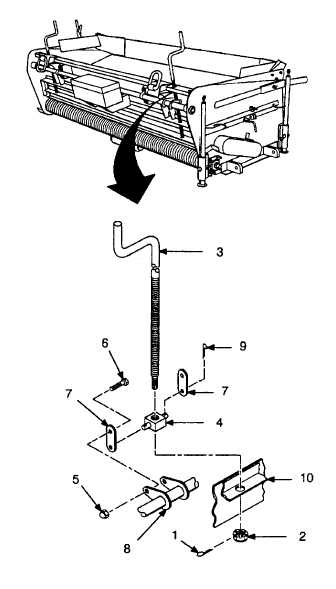
a.
Removal.
NOTE
The following procedure is for one gate
adjustment screw. Repeat for second
gate adjustment screw if necessary.
(1)
Remove cotter pin (1) and nut (2) from
adjustment
screw
(3).
It
may
be
necessary to turn screw to remove nut.
Discard cotter pin.
(2)
Unscrew and remove adjustment screw
(3) from nut (4).
(3)
Remove
locknut
(5)
and
screw
(6)
securing yoke (7) to shaft (8). Discard
locknut.
(4)
Repeat step (3) for second yoke. Remove
two yokes (7) and nut (4) from shaft (8).
(5)
Remove two cotter pins (9) and yokes (7)
from nut (4). Discard cotter pins.
b.
Installation.
(1)
Install yoke (7) on nut (4) and secure with
new cotter pin (9). Repeat for second
yoke.
NOTE
• Screws must be installed on inside with lock-
nuts on outside to prevent interference with ad-
justment screw.
• Do not fully tighten locknuts. Yokes must be free
to pivot.
(2)
Install yoke (7) on shaft (8) using screw (6)
and new locknut (5). Repeat for second
yoke.
(3)
Screw adjustment screw (3) into nut (4)
and through gate (10). Secure adjustment
screw using nut (2) and new cotter pin (1).
4-51